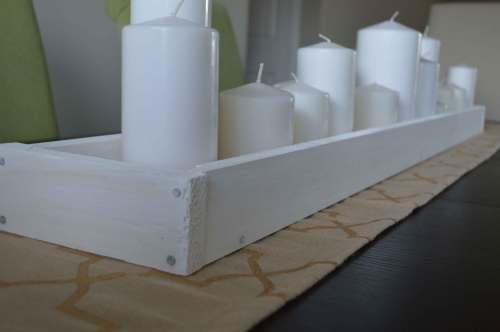
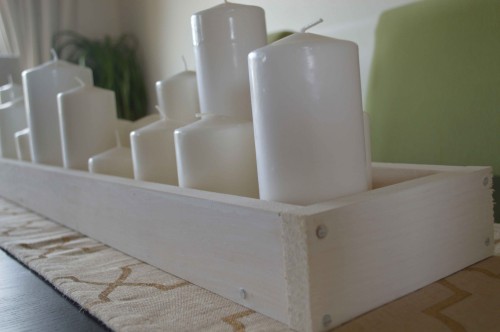
Rustic All Season Centrepiece

I am in full fledge Christmas mode.  I have been since just after Remembrance Day.  For some reason I am so excited for Christmas this year.  Last year was our first Christmas in our house and we hosted both our families here.  We will be doing the same thing again this year and I couldn’t be more thrilled.

I had most of our Christmas decorations up early but had no idea what to do for our table centrepiece.  I love Christmas but I like to keep the seasonal decor to a minimum so that we aren’t left with bins upon bins of decor that needs to be stored for 10+ months out of the year.  When it came to our centrepiece I really wanted something impactful for the holidays but that could also transition through all four seasons {or at least 2 or 3}.

I stumbled upon the Lemonade Making Momma’s post sharing her Thanksgiving decor and that is when I saw it and knew I had to have it.  I showed my darling hubby the pictures and then convinced him to accompany me to Home Depot to collect the supplies to DIY one of these bad boys.  After some back and forth in the lumber aisles my vision finally came together in his head and we were off to the races.  He banged out this project for me in under an hour last weekend and I am so totally in love {with him and the centre piece}!

Rustic-Centrepiece

Rustic-Centrepiece-1

Rustic-Centrepiece-2

Rustic-Centrepiece-3

Rustic-Centrepiece-4

As you can see we are not exactly master carpenters but, we were going for the rustic look so the “rough” look is totally okay with us!

To create our Rustic All Season Centrepiece we picked up one 6 x 1 x 8 {or those numbers in some other order} and one 3 x 1 x 8 in knotty pine.  I decided I wanted the centrepiece to be 4ft long and Patrick got to cutting all the pieces.  Not without a little supervision from our resident foreman….

Rustic-Centrepiece---helper1

Rustic-Centrepiece---helper

We put everything together with some framing nails that were chosen for ecstatic reasons only and once we had it all pieced together, I used some acrylic craft paint to give it the white washed finish.

Rustic-Centrepiece-5

I am looking forward to sharing more pictures this week of our christmas decor!

Simply Style - Signature

Makeover Monday: Guest Retreat

I am so excited to share this room with you.  From the beginning it has been one of my favourite spaces in our home as it was the one I had a “vision” for from the get go and the pieces sort of just came together.  If you have been a friend of Simply Style for any amount of time you know I could blab on and on but how about we skip that part and get to the good stuff…. pictures!

DSC_0331

That breakfast tray is a thrifted find.  I picked it up at our local Vinnie’s for $2 and spray painted it white.  I love the guest feel it adds to this space, though I have yet to serve anyone breakfast in bed here!

DSC_0316
The lamps are yet another thrifted find.  I also picked them up at our local Vinnie’s for $4 or $5 a piece and gave them coat of yellow spray paint.  The shades are from the crystal lamps that used to be in this room.
DSC_0312
The bedding is a Target US find way back when before we even moved in.  I had my heart set on it and picked it up for $20 while on a cross boarder shopping trip!

DSC_0346
You may recognize the dresser, it was the amazing hand-me-down from my in-laws.  Well the pretty lady has found its home in this space.

DSC_0368

Does this chair look familiar?  It’s probably best if it doesn’t.  It was this somewhat awful pink lady I picked up while at a charity garage sale this spring.  Well I started reupholstering her in the summer but that project was a little more involved than I had hoped for so once the body of the chair was done I came to a complete and utter halt stalled at the cushion {despite that being the easiest part} and the half finished chair sat in our hallway, cushion less,  for nearly ever.  Well I won’t lie to you, that cushion is still not properly finished but it will do for now!

DSC_0348

The ceramic owl side table I fell in love and picked up from Homesense and though I have different plans for it, it has found a temporary home in this space.

DSC_0312

The pillows are made from napkins I picked up on clearance at the end of the summer {2012} for about $5 for four {1 navy, 1 lime green, 1 teal and 1 yellow} I bought four packages and DIYed the pillows for here and the navy in our family room.

DSC_0367
We’ve had the end tables forever, they came from Walmart and cost next to nothing.  They’ve managed to survive three moves and 6 months in storage so I would say we’ve gotten our money’s worth from these!

I couldn’t resist this faceless big while at Bouclair Home one day.

The headboard is a DIY special and my first adventure in button tufting.  When we first moved into our house I attempted this project and though she could use a few improvements she does the trick in this guest space.

The tray is yet another DIY special that you may remember from here.  The apothecary jars I had on hand and filled them with seashells I had leftover from our wedding decor and feathers from my craft bins.

The art is this Ikea fabric, stretched over canvases and painted with acrylics to tie some of the colours together.  I have to give it to my Momma on that DIY as the idea was all hers!

The curtains are actually shower curtains I picked up at TJ Maxx for $11.99 a piece.  I hung an ikea sheer behind to add length and give them for a whimsy “skirted” look.

DSC_0345

Well there you have it, our guest “retreat” or at least I like to think so!  This space is all ready booked for Christmas so we must be doing something right! Until next time….


Simply Style - Signature

Woman vs. Stencil Take II: Painted Curtains

Slide1

This project is from August…..

No but seriously, I am not letting my procrastination keep your from Woman vs. Stencil: Take II

Believe it or not even after the tragic woman versus stencil marathon match that ultimately resulted in my loss by decision, I decided to tackle a stencil project again!  Trust me, I was as scared as you are to read another post about my DIY failures…. Buuuut I have to tell you something, when it comes to stenciling there are these {somewhat totally important} tools that you need called stencil brushes {who knew} and when you pick yourself up some of these nifty little gadgets I can attest to the fact that the once daunting stencil project gets a hell-of-a-lot easier!

I had been searching high and low for curtains for the coral and gold room.  I had tried some coral sheers but they were too much for the space, I had tried some white and gold geometric but they were too stark in comparison to the linen bedding.  I was at a total loss, which is not unusual when it comes to home decor lately, do you ever feel like you are just a few steps ahead of the stores?

On a whim one day I decided I would test out the linen Ikea curtains we have in the dining room in the room just too see if they would work… and I LOVED them but they were definitely missing something.  That’s when I decided I would take on my enemy, the stencil once again to give my plain old Ikea curtains a little somethin-somethin!

DSC_0049

I started with this Martha Stewart Stencil from Michaels {bought with a 40% off coupon of course}.  It cam in a variety pack of stencils and I decided this particular variety was going to be best for me, so needless to say there may be Woman vs. Stencil Part III coming your way in the future.

DSC_0050

See that there… that’s a stencil brush… and for the total cost of about $3 I was able to get a pack or 3 of them.  They made my stencilling experience oh so much more enjoyable!  As you can see I used some painter’s tape to keep my stencil in place and a paper plate to hold my {gold} paint {martha stewart craft paint}.

DSC_0056

This was the perfect second stencil project as I didn’t care if the lines were perfect.  I quickly learned that blotting off the excess paint on my brush and “reloading” more regularly was the best way to get the look I wanted and to limit dry time between moves of the stencil.

DSC_0054

DSC_0058

I just moved the stencil as I went and used the seam on the curtains as a guide to keep the pattern {somewhat} straight.

DSC_0032

and voila! Super simple DIY painted curtains.

DSC_0033

 I love the texture you get when the light hits them. Definitely not perfect but that’s the best part!

Simply Style - Signature