Turtle Turtle

Allow me to take you back…
waaaaaaaay back…..
to a decade you may not even recall…
a decade I don’t recall ever existing…..

Back to when the kitchen of our ONLY 14 year-old house

LOOKED LIKE THIS

Simply Style - Kitchen Before


oye!

No your eyes are not deceiving you, that is a real live kitchen in the real live house that we actually were in competing offers for…. believe… or not {no but seriously I’m not kidding}!

After a whole lota primer, paint and elbow grease we managed to transform our lemon lime dream kitchen to something a little more manageable…. it looks like this

Simply Style Blog - Turtle Turtle

 She aint fancy, but it is pretty amazing what a little paint and hardware can do isn’t it!

Though our chocolate brown {for now} kitchen it a heck of a lot better than the yellow and lime mess we were working with, we pretty much stripped this space of like all it’s personality.  Enter TURTLE!

Simply Style Blog - Turtle Turtle

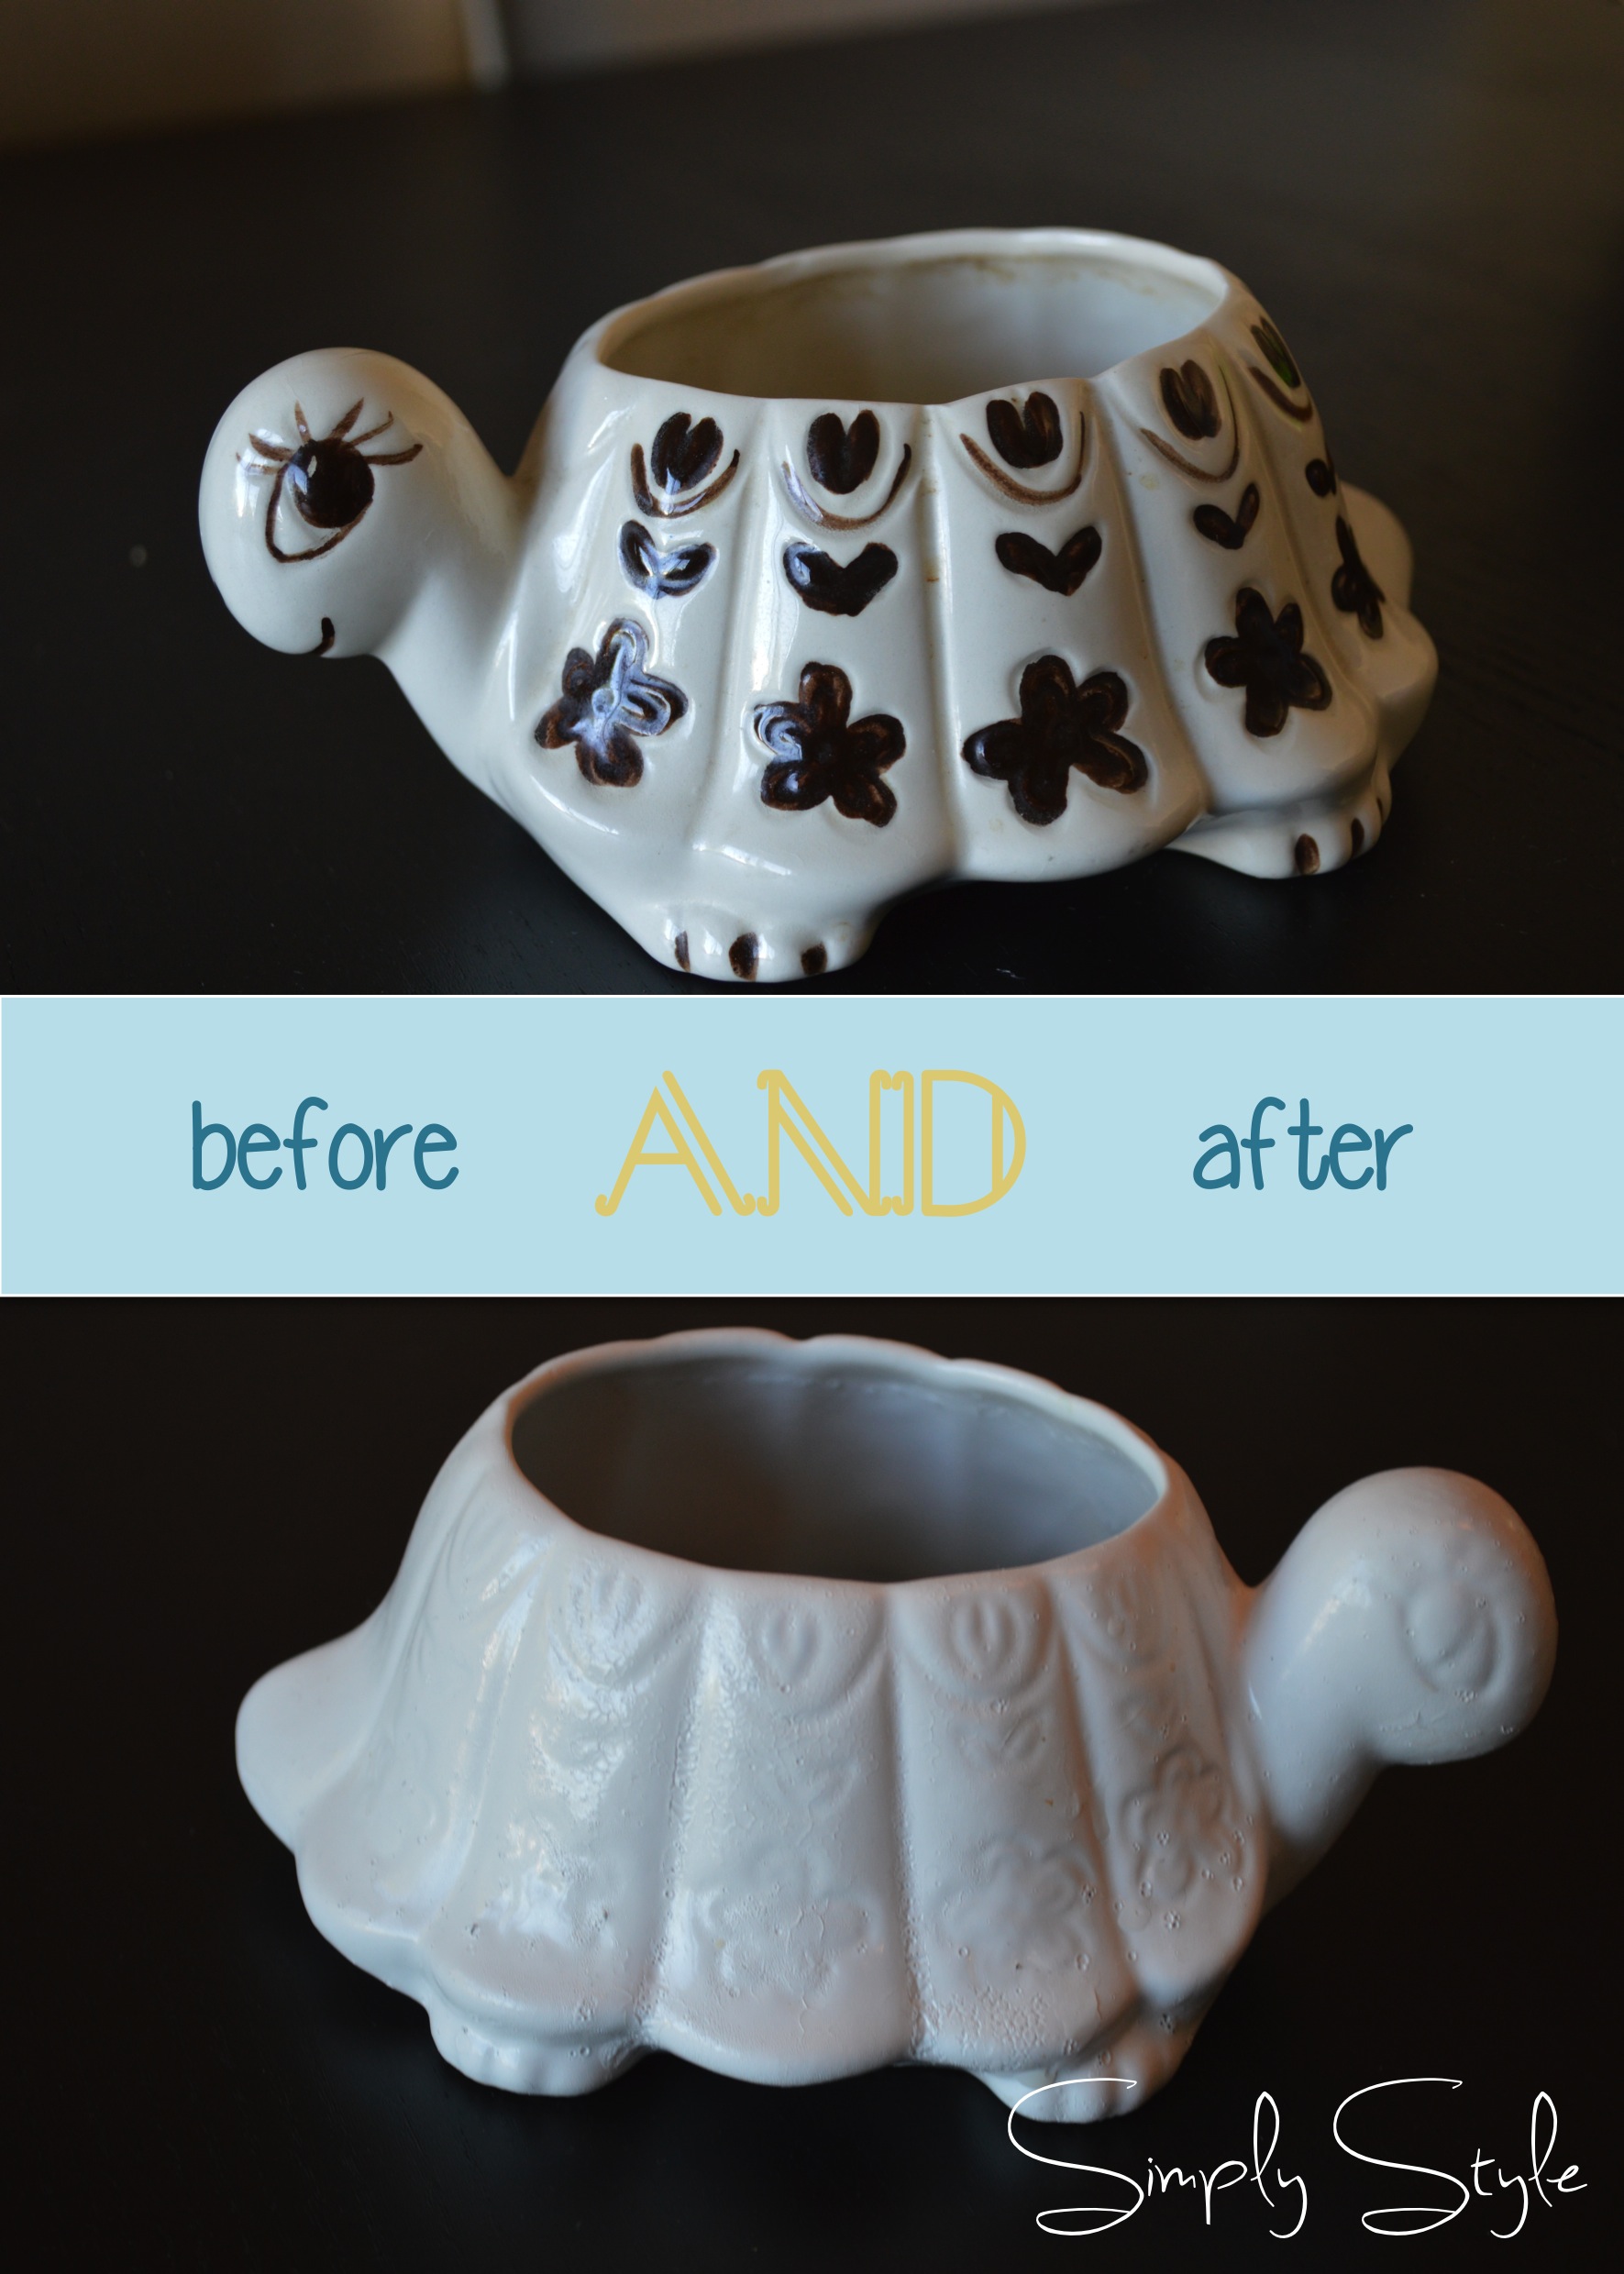
I was wandering my fav local thrift store {Vinnie’s} when I stumbled upon this open shelled beauty.  While other’s may have overlooked this $1 dude, I saw nothing but opportunity for him!

I brought him home, doused him in a coat of white spray paint and voila!

Simply Style Blog - Turtle Turtle

Like an all new man… I mean turtle!

Now you are probably wondering, what the heck are you going to do with this turtle who is missing half his shell.  Well to you strange person asking me rhetorical questions {wait that’s me} I am going to add a little personality to my kitchen that’s what.

Simply Style Blog - Turtle Turtle

ta-da, sure I could have painted him a fun bright colour but lets me honest after this mess

Simply Style - Kitchen Before

a little white turtle to hold sponges is about all I can handle…
I’m working on it with my therapist {ps. I don’t have a therapist}

So there you have it, an easy peasy ceramic animal makeover to add a little “personality” to your space!

Simply Style - Turtle Turtle

Designer on a Dime – DIY Decorative {GOLD} Spheres

Let’s talk about balls ahem, perhaps I will call them spheres instead, to save myself {and my family} the embarrassment that comes from me repeating the word balls over and over again, metal balls at that…

I am sure you’ve seen them, those decorative metal spheres, orbs, or dare I day balls {oops}.

Pottery barn did them

Image{pottery barn – galvanized metal orb $128.69}

West Elm has a few versions

Image{west elm – sculptural spheres – $31.41-$42.25}

Image{west elm – veneer spheres $17.33 – $31.41}

and even Target rocked their no longer available version of “galvanized decorative ball” {their name not mine} that Jess over at the bright green door shared here.

It was Jess’ tutorial I stumbled upon while putting in my obligatory endless hours on Pinterest one evening that inspired me.  I had considered doing something with embroidery hoops before and was excited at the idea of making myself some cheap & easy shelf decor that would fill empty space.

As you know I picked up some embroidery hoops in my latest thrifting adventure and was beyond excited to bang out this all too easy project using my most favouritest medium ever… spray paint!

#1 – Take your hoops

Image

#2 – Make your balls spheres

Image

#3 – check out your {ahem} speheres from all angles

Image

#4 – get your gold spray paint and your best grass protecting flyers

Image

#5 – get your spray paint on!

Image

#6 – check out those spheres again for good measure

Image

And last but not least…

#7 – get those beauties up on a shelf

Enough with the cheap & easy banging out ball talk… it’s time to turn the class back up here, these gold balls are nothing to make light of and since they will be living in the ever so swanky coral and gold room, let’s take a sneak peek at their new home!

Simply Style Blog - Designer on a Dime Decorative Gold Spheres

And there you have, in just 7 easy steps, two of which are completely unnecessary you too can create your own designer on a dime “spheres”

You Can’t Teach an Old Dog New Tricks … or can you?!

It was bound to happen eventually.

 a finished post.

deleted.

gone.

Now I know how all those vetran bloggers that I stalk follow have felt. You dedicate time and energy and obviously your clever whit {not so much} just to see the whole thing circle down the drain.  Wait, if I had known it was going maybe I could have stopped it… either way.  It’s gone.

Believe it or not I am sharing another project that does involve coral and gold {go me!} well sort of.  I may or may not have attacked part of this project with gold spray paint just to be swiftly put back in my place… but we’ll get to that!

Remember way back when I had an ever so successful garage sale and hand me down inheriting weekend and my amazing in-laws sent this pretty ol’ gal to us?

Simply Style Blog{in all her legless glory}

Well she moved into the shed next to the to-be-recovered-wing chair, the coffee table soon-to-be bench and the other miscellaneous projects I hide from my husband {just kidding}!

A few weekends later, while waiting to head to my girlfriends to have a furniture painting party {what you don’t rock those every Sunday} I decided I had enough time to get this pretty lady started with a coat of primer so I drug her out of the shed and gave her back her legs.

Simply Style Blog{before}

Obviously I used a my most favourite Stix primer that I pick up at my local Benjamin Moore Store.

Simply Style Blog{primed}

A coat or two later, and with still lots of time to spare, I was ready for paint.  Remember I lack patience so when I am ready, so is my project!

Simply Style Blog

Using my tried and true furniture paint, Benjamin Moore Advance but in a whole new colour…

Simply Style Blog

Now that’s colour!

Simply Style Blog

A coat or two later, I was {almost} done with this lovely lady and off to tackle dresser #2 for the day! Remember this one:

Simply Style Blog

Well Big Bertha up top here combined with 3 failed attempts to find replacement hardware forced my pretty little lady of a dresser to take a back seat for awhile. But I finally decided it was time to finish her up and it came when I first discovered GOLD!!!

See the problem here is this pretty little lady, she ain’t no spring chicken and as such her um… holes, were a little different than those sleek new dressers of today.  Well they say you can’t teach an old dog new tricks but you sure can give old dresser hardware a fresh new coat of spray paint.

I mentioned my mishap at the beginning of this post which came when I sprayed all of the existing hardware gold.  I loved the colour combo but unfortunately this just wasn’t going to work in the silver and grey room where this dresser was destined sooooo back outside {with silver spray paint in tow} I went and when all was said and done this is what I had created:

Simply Style Blog
{after}

What do you think?  Not too bad for an old girl is she?  Amazing what a little paint and some updating of old hardware can do.  Plus this girl’s still got legs!

Simply Style Blog
{before & after}